
Identification Process
KYC Proces via API
Identification Endpoint
Sandbox:
POST https://api.sandbox.billit.be/v1/einvoices/registrations/{RegistrationID}/identification
Production:
POST https://api.billit.be/v1/einvoices/registrations/{RegistrationID}/identification
📝 Precondition
You must have an active registration of your entity, the entity must be created in Billit. When the entity is active, you have a RegistrationID. More info : https://docs.accesspoint.billit.eu/docs/registering-entities. Create it with:
POST https://api.sandbox.billit.be/v1/einvoices/registrationsIf you skip or fail this step, calls to
/identificationwill return404 Not Foundor401 Unauthorized.
🔑 Path Parameters
| Name | In | Type | Required | Description |
|---|---|---|---|---|
RegistrationID | path | string | yes | The ID obtained from the initial registration (of your master account) |
🔑Header
| Name | In | Type | Required | Description |
|---|---|---|---|---|
PartyID | header | string | yes | This the the PartyID of your master account. |
🛠️ Request Body
{
  "IdentificationProviderTC": "ItsMe",
  "RedirectURL": "https://your.app/after-id-check"
}| Field | Type | Required | Description |
|---|---|---|---|
IdentificationProviderTC | string | yes | Which identity-provider Terms & Conditions you require (e.g. "ItsMe"). (Later more options then will be supported). |
RedirectURL | string | yes | Where Billit will send the user after the identity check, with two extra query parameters. |
⚠️ IMPORTANT
- You have 5 minutes to complete the check from the moment you POST.
- If the session expires or the user abandons, you must re-POST (no resume).
- Remark: when error message appears you are not authorised, contact support Billit and include the partyID of your master account.
- How do you typically launch the process ?
- From your application
- With an email notification linking to your application: then the POST command should only be launched when the user clicks on a button/link you provided (keep in mind the 5 minutes)
Example of a Post:
Header of the post (sandbox):
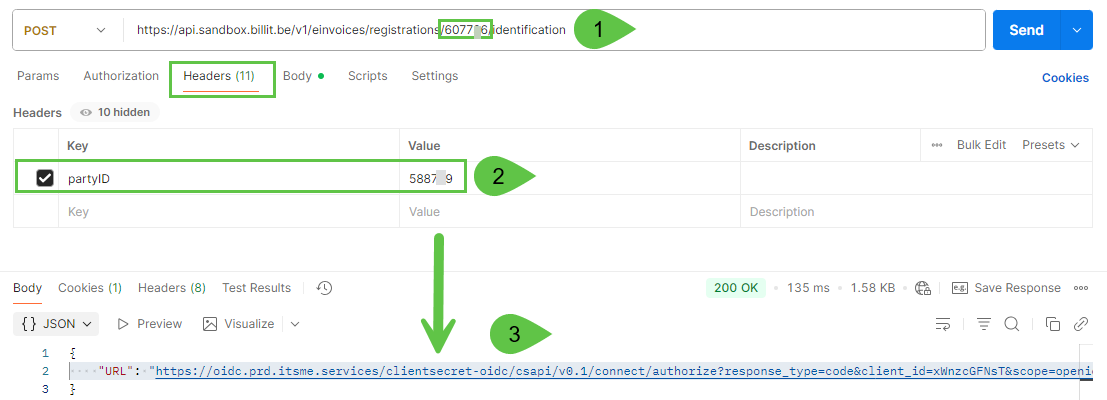
Explanation:
- POST command contains in Path/URL the RegistrationID of the created entity to be verified (subaccount linked to the master account)
- Header contains partyID = the RegistrationID of the master account (whitelisted for identification)
- Result is returned in Body
Body of the post:
{
  "IdentificationProviderTC": "ItsMe",
  "redirectURL": "testxyz/redirect"
}
Body of the returned link, this is the URL you can use to launch the Itsme validation from your application:
{
    "URL": "https://oidc.prd.itsme.services/clientsecret-oidc/csapi/v0.1/connect/authorize?response_type=code&client_id=xWnzcGFNsT&scope=openid+service:BILLITPRD_SHAREDATA+profile+eid+phone+email+address+&state=P2nLhsOjw5zDnXHDnFwifeKAoD9eSVo84oCZ.............44%2bAcOfw7w%3d&prompt=login&max_age=1&redirect_uri=https://my.sandbox.billit.be/API/OAuth2/ItsMe/CallbackAPAAS/"
}
Identification with Itsme on Sandbox versus Itsme on Production
| Environment Billit | Environment Itsme | Itsme Use | Required for sending invoices | Max # of attempts |
|---|---|---|---|---|
| Production | Production | Normal use of Itsme | Yes | Unlimited |
| Sandbox | Production | Normal use of Itsme | No | 5 |
So for testing, you can test on:
- Sandbox :
- this can be limited to 1 or a few entities for testing the mechanism. No need to run the identication on all the entities
- Max 5 attempts per entity (sandbox only)
- Each succeeded or failed attempt is counted as 1
- If you need to do more testing, continue the testing on another account
- When exceeding the limit, the error message is : "Code": "TooManyTrials", "Description": "Too many attempts"
- Production
- Where you could test on your master account, you can run the identification multiple times.
✅ Successful Response (200 OK)
{
  "RedirectURL": "https://idprovider.com/start?session=abc123"
}| Field | Type | Description |
|---|---|---|
RedirectURL | string | Full URL where you must now redirect your customer (HTTP 302 / meta). |
Next steps:
- Issue an HTTP redirect (302) to the returned
RedirectURL. - Customer (authorised user of the entity) completes the identity flow with the provider (Whitelabeled : no Billit icon or info displayed)
- Provider redirects back to Billit; Billit will automatically validate internally.
🔄 Final Callback to Your App
After the provider flow, Billit:
- Validates the incoming request.
- Determines success or failure.
- Redirects the user’s browser to your
RedirectURL, appending:
?registrationID={RegistrationID}&success=true|falseWith the registrationID and success status you know what is the result. You can store this status in your application. It is also stored on the side of Billit.
Example of result:
https://your.app/after-id-check?registrationID=42&success=truehttps://your.app/after-id-check?registrationID=42&success=falsehttps://oidc.prd.itsme.services/clientsecret-oidc/ui/v0.1/oops.html?error=invalid_redirect&error_description=The%20given%20redirect%20uri%20is%20invalidNote: Always read both
registrationIDandsuccessquery params—without them you won’t know the outcome.
Next action:
- status = success : identification is done, ready to set up integration and/or start sending..
- status = false : identification needs to be relaunched.
Updated 7 months ago